Form Layout
The middle form layout pane in the Form Builder controls the order and nesting of the registration form. Simply drag an item from the parts bin or reposition one within the form layout. The flexibility of the form builder, and the form layout pane in particular, is how we support everything from simple RSVP lists through week-long festivals.
By nesting and using branches and groups, the attendee experience can be reduced to a very simple set of choices. Luckily if you get stuck you can always call on us for help.
A key feature of the nesting (parent-child hierarchy) is that rules and restrictions on a parent also impact the child. E.g., if a top-level element is only visible to Instructors, then all of the items nested inherit that setting. It is unnecessary to flag all of the children as "Instructor" only.
Nesting elements, limiting visibility and our validation rule engine let you enforce all of your event policies as required without relying on attendees to make the right decisions.
Branches
A Branch may be added directly to the form layout. Any items nested immediately beneath the Branch will be hidden behind a checkbox when the registration form is loaded. Upon checking the box, the nested items are revealed to the user. The purpose is to clean up long or complicated registration forms and to hide unrelated elements.
Form Branches have the same options as any other form layout object such as date and visibility controls and also include a label that will be displayed next to the checkbox.
You can identify a Branch in the form layout by the following icon: ![]()
Groups
A Group may be added directly to the form layout. Any items nested immediately beneath the Group will be mutually exclusive forcing the user to select only one of the choices. Form Groups have the same options as any other form layout object such as date and visibility controls and also include the following:
- Label for display
- Required/optional flag
You can identify a Group in the form layout by the following icon: ![]()
Text Blocks
A Text Block is a Premium Plan feature that may be added directly to the form layout. It does not have a value nor a form element like radio button or checkbox so it is not intended to have elements nested beneath it. It is simply for display.
The rich text editor allows you to insert text, links and images anywhere in the registration form. Use good judgement in keeping your forms brief and usable.
You can identify a Text Block in the form layout by the following icon: ![]()
Adding To Form Layout
To add a Text Block to the form, click the wrench at the top (  ) and choose Add New and then Text Block. The Text Block will be added to the very bottom of the registration form.
Drag it to your desired position in the form layout.
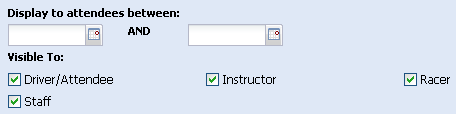
Restrict visibility by date
Unless you want to limit part of the registration form to dates other than the registration open and close dates (from the basic settings screen), you can skip this section. Otherwise, clicking any item in the form layout lets you set sunrise and sunset dates restricting its availability to a subset of the overall registration window. A blank date means "no limit".
Form layout elements with a date restriction will show this icon: ![]()
Reminder: anything nested under a package that disappears will also be limited to the same date range and will appear/disappear at the same time. Organizers use this in a variety of ways:
- Early bird discount / Late fee
- Date-based Pricing
- Staggered registration open
-
Banquet cut-offs
What not to do
With dates, it's good to not go overboard:

Remember, the nested elements inherit the dates or member flag restrictions of their parents so you don't need to flag every single element in a tree. Just flag the top level items and their children will automatically be limited. This reduces the number of things you need to change when you clone the event for the future.
Restrict visibility by member flag
In addition to restricting by date, each form item can be restricted by the types set on a member profile. All organizations start with two default flags:
- Drivers / attendee
- Instructors / staff
Premium Plan customers can add an additional 30 custom member types to more closely mirror the structure of their organization. These member types are most commonly used today in order to hide instructor registration options (often discounted or free) from students for driver schools and vice versa.
This feature requires proactive maintenance of the profile flags. Because you cannot flag a member until they have a profile (although you can force a member type to automatically be set as a default), there is often a chicken-and-egg scenario in building your segmented lists. We generally advocate having the first registration or two be based on the honor system giving the registrar a chance to flag each member appropriately and then begin hiding the options for a future event.
Alternatively, setting the member type to be user-editable will allow members to self-select the flag and instantly see the appropriate options on the registration form.